
Zoom is one of the best video communication platforms and has quickly become a favorite household name among many different types of people. Whether you're working from home, or you just want to see your family members while they are on vacation across the world, Zoom is an excellent option that offers many features and benefits. Zoom is an app that allows you to do so much more than just video chat! You can share screens during meetings for example. It also has features such as scheduling meetings and webinars without having an account which makes it accessible for everyone! Above all, you can record your zoom meetings too. Couldn't be easier, ain't it? In this article, we will take you through the process of recording a zoom video and other things associated with it such as how to edit a zoom recording. Let's dive right in.
Zoom is a powerful, easy-to-use video communications app. It's available for both desktop and mobile devices, so you can take it with you wherever you go. You won't need an account in order to attend Zoom meetings - just download the app and log on! In this post, we'll be talking about how to turn on local recording for your Zoom account. This can be helpful if you want to record meetings that are happening in person or by phone. Let's get started!
Local recording means you will be able to record meeting audio and video locally to a computer. Then the recorded files can be uploaded to Google Drive, YouTube, Dropbox, or Vimeo. To do this you need to follow the steps below-
The first step to start a zoom recording is to enable the recording option.
At the account level, you can do this by signing in to the zoom portal and then go to the menu, click on Account Management, then settings. Here you can find the recording tab, and verify that the local recording option is enabled. If it is disabled click on the toggle to enable it. You might be asked to confirm it through a dialog box, click turn on to confirm the setting.
For a group, you have to sign in as an administrator, go to the side menu and click on user management followed by group management. Find the name of the group, click on it and select the settings tab. Here, you will find the recording tab, navigate to the local recording option and check if the setting is enabled. If disabled, click on the toggle to turn it on and enable it. If it is still not working and shows gray, it must have been locked at the account level, which you must change to move ahead.
Another level is the user level, where you have to sign in to the zoom portal. Click on settings, go to the recording tab and the local recording option and enable it. If you find it to be disabled just toggle it and it will be enabled.
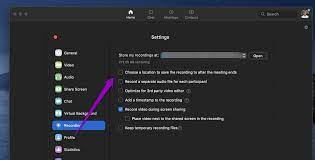
To start local recording on a desktop app, you have to, first of all, make sure you are saving it in the right folder on your desktop, to select that go to the Home tab in the app, in the upper right corner go to settings, then select recordings, and finalize the folder you want to save your recording.
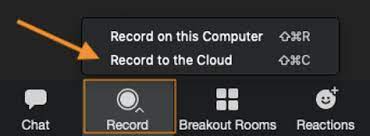
If your host has allowed a recording option then you can just click on the recording button at the bottom of the screen. This will not be possible if the host has not allowed you to start recording. The controls are present in the bottom toolbar and the notification of recording at the top left. Click on stop anytime you want to stop the recording. The recorded video will be saved to your computer, and can also be found in the "Recorded" tab in the "Meetings" section of the app.
Note - Local recording is not supported on iOS and Android. For that, you need to do cloud recording.
If you are a paid subscriber, then, zoom cloud recordings are automatically enabled for you. By using this you can record a zoom meeting and the video, audio, and chat text will be recorded in the cloud. This can be later on downloaded to a computer.
You can start a cloud recording if you are a host or a co-host. You will be required to first of all start the zoom meeting on the app. You will see three dots at the bottom right corner of the screen, click on that. Now click on the record icon for Android or Record to cloud on iOS.This should be followed by the record to the cloud option. This can be paused or ended anytime you want by clicking on the respective icons. Once the recording is processed completely it will send an email to the host with two links, one for the host and the other for the participants. You can also find the recording in the My recordings section of the Zoom website.
But downloading it is not sufficient, sometimes we want to edit the video recordings so that we can use the desired part. The process to edit a zoom video is discussed below.
We will take you through the process of editing a zoom video using different programs-
Step 1- Go to iMovie and hit on the "+" icon which is a new project and select the "movie" option.
Step 2- Now you should select the zoom recording you want to edit. So, hit the "Import" icon at the top of your screen and select the content you want to edit.
Step 3- Video is selected then you have to trim the video by dragging the desired part. The toolbar has many editing functions like split, cut, trim, timing, (slow-mo or speed), sound, text, (multiple font and style), themes. Here you can add a title to the video content.
Step 4- You can also go to settings and change the filter of your choice.
Step 5- After the editing is done you can click on the "share " button and then "file".
Step 6- In the last step press " Next" and select the location wherever you want to save the recording and press "Save".
Step 1- After your recording has been saved on the computer, right-click on it and open with the " Photos" program.
Step 2- Once it has opened in Photos, in the upper right corner click on "Edit and create". Then click on " Trim".
Step 3- Here you will find two markers one in blue and the other in white. The blue one determines the starting point while the white one is the ending point. Make sure to listen to the edit once you have trimmed it to make adjustments.
Step 4- Next, click on "Save As" in the right corner of the screen. Select the location folder and click "Save".
Step 5- Saving this may take some time depending on the file size and computer speed anywhere between 10-60 minutes.
Step 1- Log into your zoom account, because you need an account to go ahead with this process.
Step 2- Go to the settings option on the top right corner.
Step 3- Navigate to the recording option in the left side list.
Step 4- Out of all the options select "record video during screen sharing " Which is cloud recording.
Step 5- Now select the recording you want to edit and adjust the time you want to remove or keep accordingly on the slider.
Step 6- Now the recording will be saved to Zoom cloud where you can view it, share, and download it.
This trick works when for users who don't have a paid subscription. A zoom recording can be edited for free by using the editor in YouTube.
Step 1- Click on the profile photo to open the menu, then click on "your channel".
Step 2- From the channel click on the blue icon to"Upload Video".
Step 3- Click " Select File" and a pop-up box will appear.
Step 4- Locate the zoom video recording file in the correct folder. After finding it open the video.
Step 5- Type in the title for the video and write the description for it. You can also change the settings whether the video is aimed at kids or not. After completing all this, click on "Next".
Step 6- The next screen will ask you to add an end screen or any card if you want to. Once done with that click " Next".
Step 7- Choose the visibility settings whether you want it to be publicly viewable or not and click "Save" once finished.
Step 8- The next page will show videos you have uploaded to the channel and then you can click ok the pencil icon next to the video thumbnail.
Step 9- On the video details page click on the editor in the sidebar.
Step 10- You can now access the editing functions, so give your video the edits it needs and get the desired results.
Step 11- In the upper right corner of the page click "Save" and Voila! Your editing is done. Now you can share the video on YouTube or simply download it as a recording file. Using YouTube will let you save any extra charges invested in a video editor. These recordings can be helpful to upload on any social media platform. It can serve as an extremely powerful tool for your video marketing strategy.
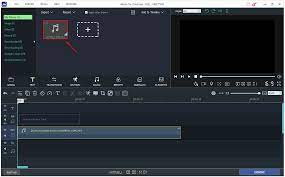
You can use our Video editor from Offeo to edit a zoom recording after you have saved it. You do not need anything more than a PC and an internet connection to do this. Our easy-to-use interface enables people with no experience too to be able to edit their own zoom recording. Video editing was never this easy, with our features that are trouble-free and save your time. Go ahead and use our video editing feature to channel your inner creativity to get the perfect video.


.jpeg)


